Taylor and I decided a while ago that we would go to a local comic con. She had been to a couple before, one time not dressing up at all, another time half-heartedly attempting it. We talked about doing the whole cosplay thing and decided that we’d have a go at it.
We didn’t want to spend a load of money – nor did we want to buy something already made up by someone else. Most of the point was trying to make something half decent for ourselves.
We bandied about a few ideas and spent a drunken night or two trying to decide who to be. The problem is, Taylor and I look almost identical. There were few related people we could think of that we liked, would want to dress as, and could be told apart as. In the end, we gave up on that plan and decided to go as our Dungeons and Dragons characters, who are sisters anyway, so it would be realistic! Mostly we just wanted to make armour.
We asked a family friend who’s both good at this sewing lark and incredibly knowledgeable about lots of stuff. She pointed us in the direction of a relatively cheap fabric shop. We bought some leatherette. It arrived. We smelled it a bit (it didn’t smell good) and unrolled it and rolled it up again. Eventually, time started to run out so by necessity we got brave.
Making the Armour
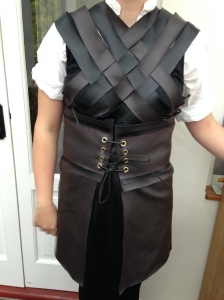
We were agreed on one thing, and one thing only. We didn’t want what we have dubbed ‘booby armour.’ This is in reference to the fantasy trope of having women with busty armour. It’s not that we particularly mind boob armour (mostly we find it hilarious) but we didn’t want to be running the risk of indecent exposure, and didn’t really trust our sewing skills. So our initial research centred around how to make a bodice that wouldn’t leave us hanging out.
After perusing pinterest for some time, and googling ‘female armour’ (which mostly got us boob armour…) we finally settled on a sort of interlocking weave design.
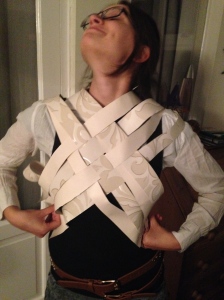
I have the sort of brain that can picture things pretty easily – I’m good at visualising solutions to problems, not so good at actually putting them into action. Fortunately, the whole interlocking idea was pretty easy to sew.
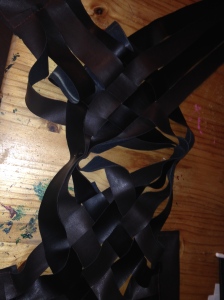
The strips of leather were alternating in colour, and attached at each end to another leatherette strip, folded in half for extra strength, that we then punched eyelets in, so we could tie them together with string.
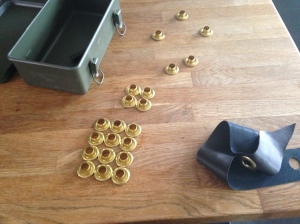
Our step-dad, ever the sort of bloke with a zillion random things in his shed, had an eyelet kit for his ‘tarpaulin repair kit.’ I don’t even know, but it was pretty useful. Mr T got handy with a hammer and punched the holes in.
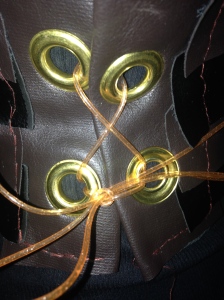
We didn’t have anything to tie them with apart from scoobies at first, but it gave us the idea! Because the bodice tied up on both sides, we were able to get some flexibility in terms of fitting, so we didn’t have to worry so much about getting it perfect. We sewed on some shoulder pads to hold it all together, as they would just pull apart (the interlocking design didn’t tie it together!) if you picked them up wrong. The shoulder pads also made it easier to get in the right place.
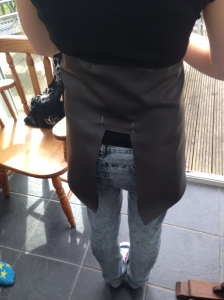
Next came the skirt, which we made separately. The idea was to have a belt that tied much the same as the sides of the bodice. Onto that, we would sew two panels for the sides. In the gaps, we’d put another two strips (in a different colour) to protect our dignity. We did it this way, as we figured it would be easier to move about, and again, we’d have less chance of making them too small or big. Hanging everything from the belt meant we had one pretty straightforward dimension to work from.
Taylor is much more curvy than me though, and she had a bit of a wider gap with her belt because of this. Not that it mattered, it just made our armour a little bit unique. We had some fun cutting the panels – initially cutting two the same, rather than two that were opposite to each other, and therefore would match when put on opposite sides of the belt. But we got there between us and had enough spare leatherette to make some mistakes.
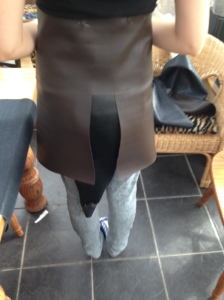
The central pieces we cut according to the size of the gap – the ones at the front of our armour were bigger than the ones at the back. We cut them to a triangular shape at the bottom (not the tail Taylor looks like she has in the picture) to make them look a little decorative.
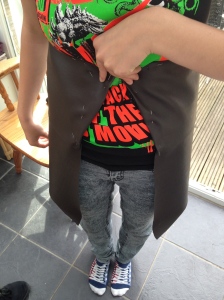
Then we cut another two thinner strips – one black one brown – for the belt and sewed it all together. It took AGES. But we got there eventually. The trickiest part was sewing on the front black strip. The idea was that it would be attached on one side, then buttoned up on the other when you put the armour on. The black would then be a backdrop for the string we used to tie the armour. Remembering not to sew it completely to the belt was tricky, and a bit scary. We’d got far enough that we really didn’t want to mess up. Then it was just a case of punch in a few more eyelets, sew on a button and make a button hole, and we were done.
Next we had to decide what to wear underneath. We’d decided leggings, an old-fashioned looking shit (I’m wearing my step-dad’s shirt, hence the enormousness of the thing. He’s over six foot tall.) with a black tank top on top to disguise the gaps in our bodice a little better.
Taylor managed to find some leather string that we used to tie our bodice and belt. It all fit well, and I didn’t feel in too much danger of having a wardrobe malfunction!
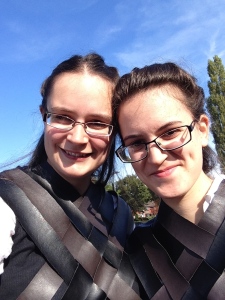
Here we are outside comic con about to head inside. The armour held up well on the day, though it was very sweaty. Taylor lost one eyelet (when we ran out of the massive ones our stepdad bought, we used some bought in the shop and they were a bit rubbish) but apart from that there wasn’t any damage. It’s now hanging up in Mum’s garage ready for next year.
Not bad for two girls who hadn’t picked up a needle before!
